How to Create Bounding Polygon Annotation Tool
- Published on
- Updated on

If you need to create client side configuration to determine the location of objects, for example for your model training, then this post is for you. In this blog I will show you how you can create a user draw polygon shaped bounding box annotation in images or videos using React and Konva.
Introduction
The idea is, in many computer vision projects we need to have information about the coordinates of the object.
In this blog I am going to create a minimal react application to draw polygon bounding annotation area to configure the coordinates of the object in the image.
First of all, to perform drawing on images we need canvas object, for this I used Konva.js. It is an open source
library for HTML5 Canvas 2d context. If you don't know what canvas is... it is an HTML5 element
and it is a place to draw graphics, animation, photo manipulation, video processing etc. Doing
complex tasks on canvas requires lots of consideration, but thanks to Konva.js it is more easy.
Konva.Stage is the container for the layers. Konva.Layer is the canvas element. Layers can
contain shapes, groups of shapes, or groups of other
groups. The stage, layers, groups, and shapes are all virtual nodes, similar to DOM nodes in an
HTML page. Konva gives draggable properties to shapes and groups. It also gives the ability to
resize and rotate functionality to nodes with Transformer.
Final Code
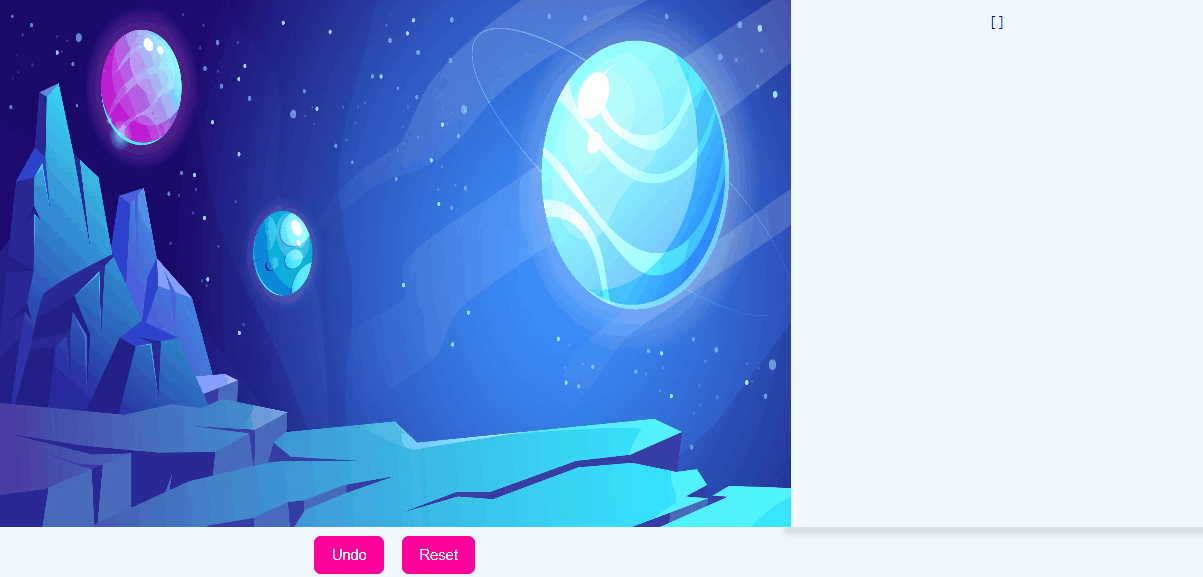
Bounding Polygon Annotation On An Imaginary Landscape
You can find source code of the sample react application from here. See live demo from here
Installations
npx create-react-app konva-draggable-polygon
npm install react-konva
The PoylgonAnnotation Component
We will write a polygon component consisting of Circle and Line. While circles are vertices of polygon shape, line is the element that unites these vertices. We say that if the first vertex and the last vertex are the same, a closed shape, that is, a polygon, is created at the end.
We will collect this shape in the Group element. The reason we use the group is necessary to be able to handle the draggable functions of the closed shape consisting of circle and line. When I first tried with line and circle, I encountered problems such as distortions in mouse position after drag and drop operations or mixing of drag drop events, so I used group.
import React, { useState } from 'react'
import { Line, Circle, Group } from 'react-konva'
import { minMax, dragBoundFunc } from 'utils'
/**
 *
 * @param {minMaxX} props
 * minMaxX[0]=>minX
 * minMaxX[1]=>maxX
 *
 */
const PolygonAnnotation = (props) => {
  const {
    points,
    flattenedPoints,
    isFinished,
    handlePointDragMove,
    handleGroupDragEnd,
    handleMouseOverStartPoint,
    handleMouseOutStartPoint,
  } = props
  const vertexRadius = 6

  const [stage, setStage] = useState()
  const handleGroupMouseOver = (e) => {
    if (!isFinished) return
    e.target.getStage().container().style.cursor = 'move'
    setStage(e.target.getStage())
  }
  const handleGroupMouseOut = (e) => {
    e.target.getStage().container().style.cursor = 'default'
  }
  const [minMaxX, setMinMaxX] = useState([0, 0]) //min and max in x axis
  const [minMaxY, setMinMaxY] = useState([0, 0]) //min and max in y axis
  const handleGroupDragStart = (e) => {
    let arrX = points.map((p) => p[0])
    let arrY = points.map((p) => p[1])
    setMinMaxX(minMax(arrX))
    setMinMaxY(minMax(arrY))
  }
  const groupDragBound = (pos) => {
    let { x, y } = pos
    const sw = stage.width()
    const sh = stage.height()
    if (minMaxY[0] + y < 0) y = -1 * minMaxY[0]
    if (minMaxX[0] + x < 0) x = -1 * minMaxX[0]
    if (minMaxY[1] + y > sh) y = sh - minMaxY[1]
    if (minMaxX[1] + x > sw) x = sw - minMaxX[1]
    return { x, y }
  }
  return (
    <Group
      name="polygon"
      draggable={isFinished}
      onDragStart={handleGroupDragStart}
      onDragEnd={handleGroupDragEnd}
      dragBoundFunc={groupDragBound}
      onMouseOver={handleGroupMouseOver}
      onMouseOut={handleGroupMouseOut}
    >
      <Line
        points={flattenedPoints}
        stroke="red"
        strokeWidth={3}
        closed={isFinished}
        fill="rgb(0,128,0,0.5)"
      />
      {points.map((point, index) => {
        const x = point[0] - vertexRadius / 2
        const y = point[1] - vertexRadius / 2
        const startPointAttr =
          index === 0
            ? {
                hitStrokeWidth: 12,
                onMouseOver: handleMouseOverStartPoint,
                onMouseOut: handleMouseOutStartPoint,
              }
            : null
        return (
          <Circle
            key={index}
            x={x}
            y={y}
            radius={vertexRadius}
            fill="white"
            stroke="black"
            strokeWidth={2}
            draggable
            onDragMove={handlePointDragMove}
            dragBoundFunc={(pos) => dragBoundFunc(stage.width(), stage.height(), vertexRadius, pos)}
            {...startPointAttr}
          />
        )
      })}
    </Group>
  )
}

export default PolygonAnnotation
The highlighted code lines are responsible to prevent the Group from leaving the canvas.
I will explain in more detaiş by destructing the above code block as elements and events in the following section.
Group: The Group of Shapes
There are events for drag drop operations in Konva, we wrote callbacks for these events in the Group element.
In handleGroupDragStart we save the minimum and maximum x and y coordinate values with setMinMaxX and setMinMaxY helper functions respectively. When drag starts these values are setted in the locale state with react useState.
Whereas dragBoundFunc is a property used to override drag drop positions while dragging event. In groupDragBound function, if the minimum of the drag starting point and the sum of the positions formed by drag is less than 0, we set it back to 0, in the same way, if the sum of the drag and max position is greater than the width of the stage, we set it to the width of the stage. Thus, we ensure that the dragged group remains on the canvas.
Circles: Draggable Vertices
//src/components/PolygonAnnotation.js
...
{
  points.map((point, index) => {
    const x = point[0] - vertexRadius / 2
    const y = point[1] - vertexRadius / 2
    const startPointAttr =
      index === 0
        ? {
            hitStrokeWidth: 12,
            onMouseOver: handleMouseOverStartPoint,
            onMouseOut: handleMouseOutStartPoint,
          }
        : null
    return (
      <Circle
        key={index}
        x={x}
        y={y}
        radius={vertexRadius}
        fill="white"
        stroke="black"
        strokeWidth={2}
        draggable
        onDragMove={handlePointDragMove}
        dragBoundFunc={(pos) => dragBoundFunc(stage.width(), stage.height(), vertexRadius, pos)}
        {...startPointAttr}
      />
    )
  })
}
As you can see, Circle elements in our component take the points value from the outside as property, and we will actually transfer these points from the outside, that is, from the parent. And these circle elements are positioned at x and y coordinates while considering the coordinate values (points) from the parent as well as considering the diameter of the circle.
...
points.map((point, index) => {
    const x = point[0] - vertexRadius / 2
    const y = point[1] - vertexRadius / 2
    ...
})
Here, too, our vertices are draggable, so we prevent the vertices dragged with dragBoundFunc from leaving the canvas.
The onDragMove callback is also taken from the parent as a property. Because the points are added to the stage element with the onMouseDown event, that is, the mouse event where the drawing is made, and the points drawn with the mouse are passed to our component as property.
Line: Closed Shape
The line element creates a closed shape with the isFinished property with the values formed by flattening the points. If it is closed, we can paint the area with the color given in the fill property.
The Canvas Component
In this part we are going to use the above component which is reusable.
import React, { useMemo, useRef, useState, useEffect } from 'react'
import PolygonAnnotation from 'components/PolygonAnnotation'
import { Stage, Layer, Image } from 'react-konva'
const videoSource = './sampleImage.jpg'
const Canvas = () => {
  const [image, setImage] = useState()
  const imageRef = useRef(null)
  const dataRef = useRef(null)
  const [points, setPoints] = useState([])
  const [size, setSize] = useState({})
  const [flattenedPoints, setFlattenedPoints] = useState()
  const [position, setPosition] = useState([0, 0])
  const [isMouseOverPoint, setMouseOverPoint] = useState(false)
  const [isPolyComplete, setPolyComplete] = useState(false)
  const videoElement = useMemo(() => {
    const element = new window.Image()
    element.width = 480
    element.height = 360
    element.src = videoSource
    return element
  }, [videoSource]) //it may come from redux
  useEffect(() => {
    const onload = function () {
      setSize({
        width: videoElement.width,
        height: videoElement.height,
      })
      setImage(videoElement)
      imageRef.current = videoElement
    }
    videoElement.addEventListener('load', onload)
    return () => {
      videoElement.removeEventListener('load', onload)
    }
  }, [videoElement])
  const getMousePos = (stage) => {
    return [stage.getPointerPosition().x, stage.getPointerPosition().y]
  }
  //drawing begins when mousedown event fires.
  const handleMouseDown = (e) => {
    if (isPolyComplete) return
    const stage = e.target.getStage()
    const mousePos = getMousePos(stage)
    if (isMouseOverPoint && points.length >= 3) {
      setPolyComplete(true)
    } else {
      setPoints([...points, mousePos])
    }
  }
  const handleMouseMove = (e) => {
    const stage = e.target.getStage()
    const mousePos = getMousePos(stage)
    setPosition(mousePos)
  }
  const handleMouseOverStartPoint = (e) => {
    if (isPolyComplete || points.length < 3) return
    e.target.scale({ x: 3, y: 3 })
    setMouseOverPoint(true)
  }
  const handleMouseOutStartPoint = (e) => {
    e.target.scale({ x: 1, y: 1 })
    setMouseOverPoint(false)
  }
  const handlePointDragMove = (e) => {
    const stage = e.target.getStage()
    const index = e.target.index - 1
    const pos = [e.target._lastPos.x, e.target._lastPos.y]
    if (pos[0] < 0) pos[0] = 0
    if (pos[1] < 0) pos[1] = 0
    if (pos[0] > stage.width()) pos[0] = stage.width()
    if (pos[1] > stage.height()) pos[1] = stage.height()
    setPoints([...points.slice(0, index), pos, ...points.slice(index + 1)])
  }

  useEffect(() => {
    setFlattenedPoints(
      points.concat(isPolyComplete ? [] : position).reduce((a, b) => a.concat(b), [])
    )
  }, [points])
  const undo = () => {
    setPoints(points.slice(0, -1))
    setPolyComplete(false)
  }
  const handleGroupDragEnd = (e) => {
    //drag end listens other children circles' drag end event
    //...that's, why 'name' attr is added, see in polygon annotation part
    if (e.target.name() === 'polygon') {
      let result = []
      let copyPoints = [...points]
      copyPoints.map((point) => result.push([point[0] + e.target.x(), point[1] + e.target.y()]))
      e.target.position({ x: 0, y: 0 }) //needs for mouse position otherwise when click undo you will see that mouse click position is not normal:)
      setPoints(result)
    }
  }
  const showCoordinates = () => {
    if (isPolyComplete) dataRef.current.style.display = ''
  }

  return (
    <div
      style={{
        display: 'flex',
        justifyContent: 'center',
        flexDirection: 'column',
        alignItems: 'center',
      }}
    >
      <Stage
        width={size.width || 480}
        height={size.height || 360}
        onMouseMove={handleMouseMove}
        onMouseDown={handleMouseDown}
      >
        <Layer>
          <Image ref={imageRef} image={image} x={0} y={0} width={size.width} height={size.height} />
          <PolygonAnnotation
            points={points}
            flattenedPoints={flattenedPoints}
            handlePointDragMove={handlePointDragMove}
            handleGroupDragEnd={handleGroupDragEnd}
            handleMouseOverStartPoint={handleMouseOverStartPoint}
            handleMouseOutStartPoint={handleMouseOutStartPoint}
            isFinished={isPolyComplete}
          />
        </Layer>
      </Stage>
      <button style={{ marginTop: 20 }} onClick={showCoordinates}>
        Coordinates
      </button>
      <button style={{ marginTop: 20 }} onClick={undo}>
        Undo
      </button>
      <div
        ref={dataRef}
        style={{ display: 'none', width: 400, boxShadow: '7px 7px 5px .4em rgba(0,0,0,.1)' }}
      >
        <pre>{}</pre>
      </div>
    </div>
  )
}

export default Canvas
Setting Image In Canvas
In the highlighted code above, we set an image inside the canvas. To this we used the Konva Image element.
In line 15, by using useMemo we prevented the image element from being created repeatedly in each render. Whatever Image's size is, we set it to Stage's width and height. We did this in the image onload event listener. We removed the event listener here with useEffect return.
Events on Stage
We added our onMouseDown event callback in line 40, which provides the drawing on every mouse down (say when user presses the mouse or even you may say mouse click🙂) , and the onMouseMove event callback in line 50, that sets the mouse's position to the state that everyone can access locally.
In our onMouseDown event, we set the clicked coordinates (points) when the mouse is pressed, that is, when the mouse is clicked, and we pass it as a prop to our PolygonAnnotation component. The Component creates circles for the coordinates, and lines between circles. And if the first circle and the last circle are in the same position, it creates a closed shape and we can't perform draw action anymore -because we allow only one annotation shape-, and we do this with the statement in line 41; however we can drag and drop the shape to change the coordinates of the annotated the region.
Conclusion
In this blog, I have created bounding polygon/box annotation tool with react and react konva. It can be used for computer vision projects, especially for detecting the location of the object or client side configuration for marking the area to be trained. For this, I used the Konva.js library, not the HTML5 Canvas Api directly. Because React Konva provides capabilities that make easy drawing and drag and drop operations on canvas. The documentation of Konva.js is very good and I saw that Anton Lavrenov especially tried to answer questions about the library, with examples. But I could not see an example project that allows to configure such a custom shape, which is restricted inside the canvas, from the end user. That's why I created this post. It may not be a super nice solution, so you are very welcome with your feedback. I hope I was able to help you with this article. Best.
Update
I am very happy that this post has been helpful to some of you. I've received several emails asking how to implement multiple polygon drawing. In response, I have published an npm package that is more customizable and allows for multiple polygon drawing. You can find the repository here.